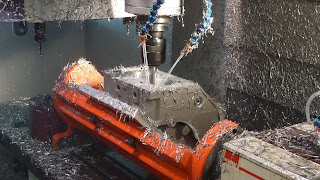
Now that the crankshaft split surface and related features are machined the rest of the machining process for the part is easier. If all of the previous scanning, QC and OP1 processes went correctly then this stage should be a breeze. Hopefully I don’t regret that statement!
We are starting here, a part located on the fixture plate with the majority of machine work yet to be done.
The next machining steps are as follows:
- machine the generator side features: gasket surface, mounting holes, and main galley oil passages, and logo cleanup
- machine clutch side features: gasket surface, mounting holes

The logo on this side was left as-cast to see which looks better. I prefer the milled one.
The part then gets rotated 90 degrees for the following operations:
Bank1:
- Face deck surface with 6″ face mill. The 6″ diameter tool machines the deck surface with one sweep, crating a very flat and consistent surface.
- Rough mill cylinder bores. I use a long 3/4″ diameter 6″ long 3 flute carbide end mill held in a milling chuck, both from Mari Tool, for maximum rigidity. The cut was deep but clean with no chatter. It was a good enough finish to send directly to the platers but I wanted the extremely straight bore that a finish pass with a boring head would provide.
- Cleanup coolant port passages. This was step one in showing how well the internal coolant ports were aligned to t he core and cope of the mold. One bank had excellent alignment, one bank needed a bit of tweaking, but this is the area where we expected a large tolerance stackup. Harmony will likely revise the gauges used to place the cores to all
- drill and tap cylinder head bolts and dowel holes
- Finish cylinder bore to .008″ oversize in preparation for nickel silicon carbide plating by Millennium Technologies. This was done using one of the single point boring bars from Microbore with a TCGT ground and polished carbide insert.
Then repeat the same operations for Bank 2.
Valley:
- coolant ports gasket surface milling
- coolant port mounting holes drill and tap
- oil pressure sensor drill and tap
So far so good. No crashes, although I did nearly break a couple of tools from unforeseen interference between the trunnion tailstock and the long tools installed in the toolchange umbrella.
In general the entire machining process was fault-free. The stiffness of the trunnion from Martin Mfg. was excellent. The large tools cut as if the part was clamped directly to the machine table, no ringing, chatter, or other abnormal tool behavior. The bore finish from the Microbore boring bars is better than expected.
Once the casting patterns have some slight revisions done they’ll run 5 more parts that will then get machined.
I am very satisfied with the results so far. The sample casting for the girdle part just arrived, so now I can start directly on that and hopefully have just as good a time.
That’s all for now.
Chris


Cool stuff. Would love to get a July update off all the parts (swing arm, frame, motor) What is your master plan for order of thing to get done.